Friday, September 27, 2013

double knot yarn join with a colour change...

During my quest for learning new techniques in crochet, I came across a new method for joining yarn that leaves you with no ends to sew in.

EDIT: Just noticed that the video isn't showing for some reason. :(
You can access it here -> http://youtu.be/-nq_7EXTWHE


Not being a huge fan of sewing, this appealed IMMENSELY to me. I've tried it with lots of different yarns and found that for most, it's a fairly secure way of joining and if you are using the same colour, it's almost invisible. But then I got to thinking, what if you wanted to do a colour change using this method? How would that work? So I did some playing around and the following was the result...


So you start off with by completing the whole stitch in the old colour.


Then cut the old yarn leaving a tail of approximately 2cm, or the width of your thumb if you can't be bothered measuring. The tail needs to be long enough for you to grab to tighten the knot, but will be cut off after you're finished so the shorter the tail, the less yarn you waste.


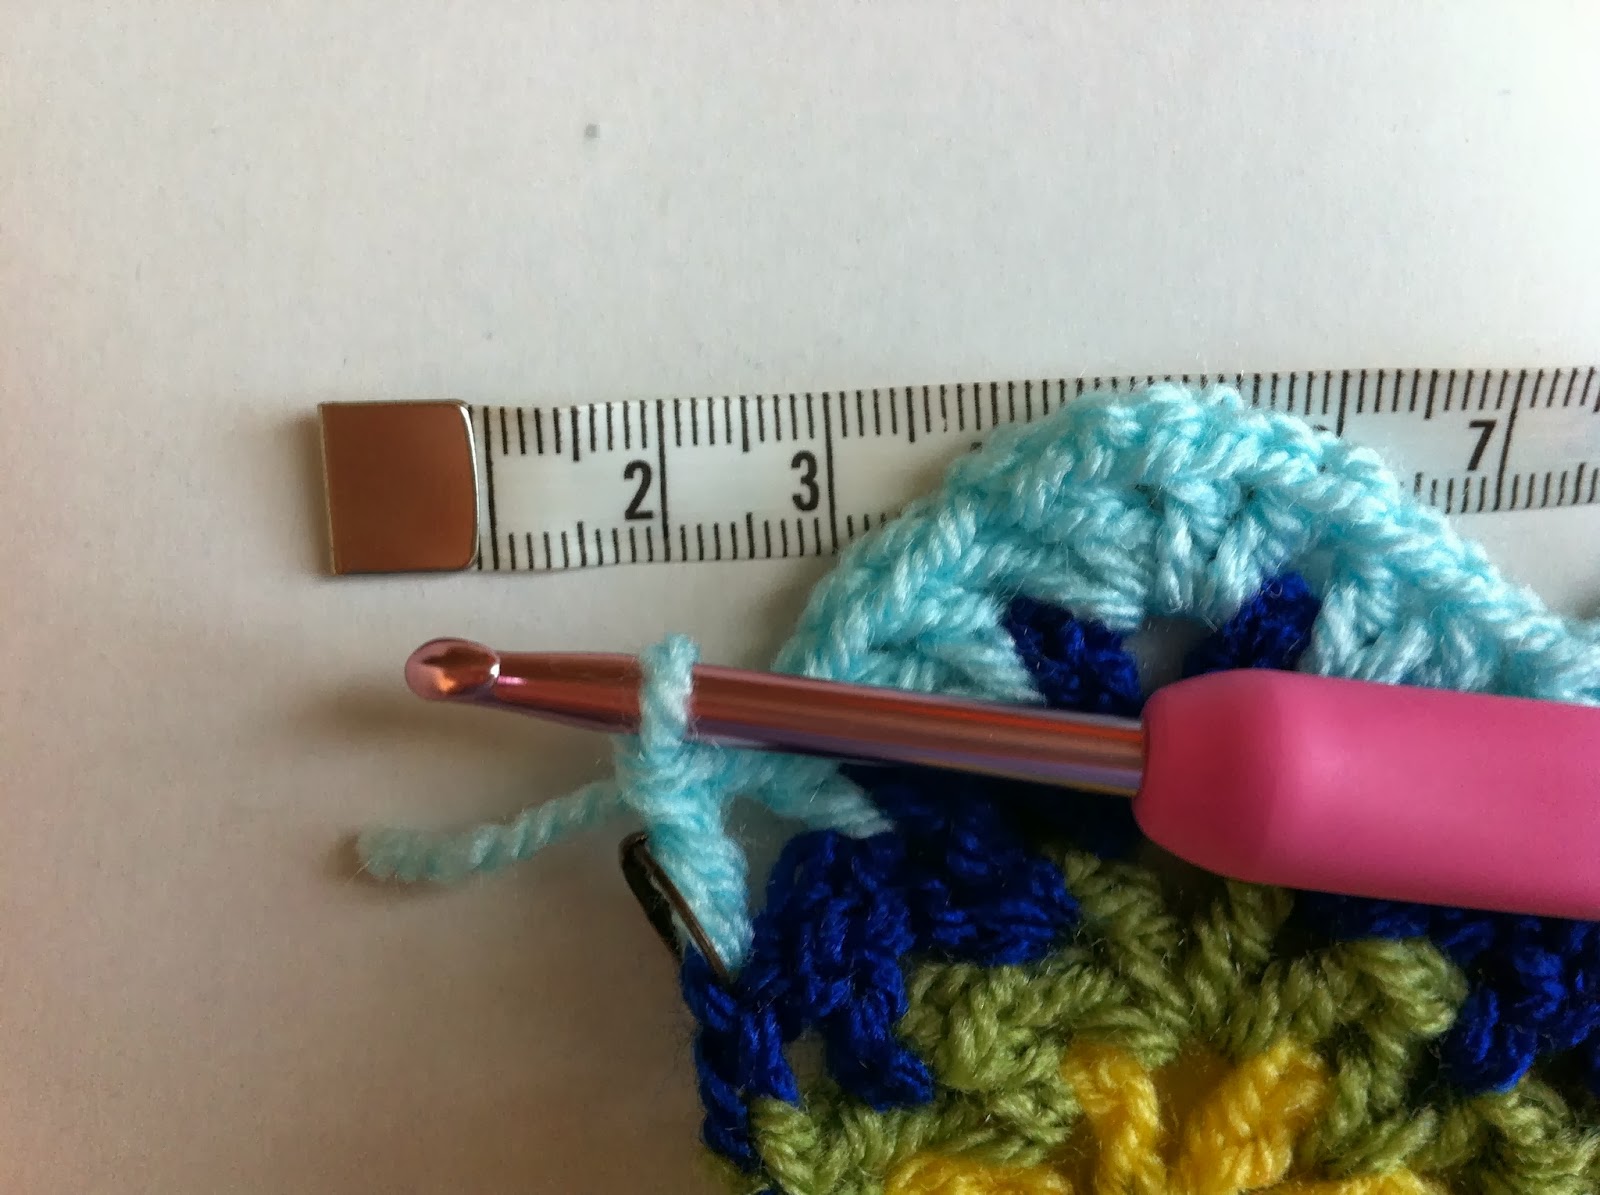
Undo a couple of stitches so you have enough room to manipulate the yarn to make the knots


Then it's time to join the new colour! You can watch the video I've posted at the beginning of this post but basically, you need to do the following...


Old colour goes under the new one...


over the top of both...


back under the old and through the loop...


The knot needs to be made leaving a tail that is approximately 1cm longer than the tail you left back at the beginning. So if you did 2cm, then the tail will be 3cm. If you did a thumb width, then the tail will now be a thumb width plus 1cm.
(This assumes you are working with DK (8ply) yarn with a 4mm hook. If you are using a smaller hook, then you will need to make the extra smaller, if you are using a larger hook, then you will need to make the extra longer. As a guide, the extra needs to be between 2 and 3 times your hook size which means that the last loop will be in the new colour.)


Tie a knot in the new colour. Make sure you pull the tail and strand of each yarn hard to make the knot nice and tight.


Pull the two strands to bring the knots together.


Cut the tails. Always cut the new colour first, then test your knot. If it doesn't hold once the tail has been cut off, you can redo it, making it tighter, or use a different method, and you should still have enough tail on your old colour to do something else. If you cut the old colour and then find out that the knots won't hold with your yarn, then you'll be very very very sad.
BUT if this is the first time you've done this, you might want to actually leave this step until after you have redone the stitches to make sure you are happy with where the knot is.


Redo the stitches you've done. The working loop on your hook should now be the new colour. If the knot isn't quite in the right place, you can play around with your tension on the last couple of stitches to get it in the right place. Or if you haven't cut your tails off, you can move the knot. Once you are happy with where the knots are, if you haven't cut your tails off yet, you can do that now.


Can you see the knot? It's not invisible - there will be a spot of each colour visible, but if you are doing the changes at the end of each row, and doing a border, those little knots will be covered up. But there are no ends to sew!!! How cool is that???

Now, this will not work with every yarn. I've found one that is too slippery (a cheap one from the $2 shops that's just label "knitting yarn 100gms super value") - the knots will unravel when you rub them with your fingers - so please make sure you tighten the knots as much as you can, and then have a little play with them, rubbing them back and forth between your fingers, to make sure that they hold... 

Let me know if it works for you or if there are any yarns you've found that you definitely shouldn't do this with.

:)


Wednesday, December 5, 2012

Christmas time already?

Wow, it's been awhile since I've been here, hasn't it? I guess this once a week thing isn't really working out for me at all! Oh well, better late than never...

So it's almost Christmas. Again. Time to put up the tree and organise presents.

This year, seeing we have a mobile toddler in the house, the tree has been put up inside the portacot (for it's protection). I reused the decorations from last year's jacaranda colour theme that L wanted but decided that the star was too heavy and kept wanting to make the tree lean, so I would replace it with something home made. I haven't really decided what yet... maybe a star or snowflake... maybe an angel.

But, while I was looking for inspiration for what to do, I had an idea for what to do with some of the milk bottle top rings that I've been collecting... Would you like to see?


I found a nice pattern for some itty bitty stars (with 5 points) but I thought they didn't really say "Christmas", so I played around a bit and tried them with 6 and 8 points... The 8 point ones look a little more snowflake-ish to me, what do you think? I'm going to play around with some different colours and yarns and see what happens. If you want to make some, the pattern for them is as follows:

Materials needed:
small amount of yarn (I used 8 ply, about 5.5m to make the 8 point star version)
3.5mm hook (or whatever size hook needed to make star small enough to fit inside milk bottle top ring)
milk bottle top ring
yarn needle

Abbreviations (International/UK terminology):
CH chain
SS slip stitch
DC double crochet
TR treble
MC magic circle

Pattern for 5 point star, changes for 6 and 8 point stars in (brackets).

Rnd1. magic circle [or CH5, SS into first CH to create a ring]
Rnd2. (Work all stitches into ring or MC) Standing TR [or CH3], *DC, TR, CH3, TR* 4 (5,7) times, DC, TR, CH3, SS into beginning standing TR [or third CH of initial CH3]
Rnd3. Turn, SS into CH3 space. *DC through CH3 space and around milk bottle top ring, DC9 (9,7) around milk bottle top ring* 5 (6,8) times. SS into initial DC. CH20, SS into initial DC. Fasten off, weave in ends.

That's it! You're done. A pretty little snowflake-esque star to hang on your tree, or embellish your gift with, and all done in about 10 minutes!

Saturday, October 20, 2012

Flutter Flutter Flutter...


It's been awhile since I've posted anything - I've been busy with L & M and trying to get some presents finished. Not really very good excuses, but they're all I have. Anyway, to make up for it, I thought this time, I would share with you some lovely butterflies that one of the ladies from the Krista group made.


Sue spent quite a bit of time at a hospital recently while her daughter underwent surgery. To fill in the hours, she yarnbombed the place with some butterflies. I think they are gorgeous and hopefully cheered up the day of the other visitors.


What do you think? Would one of these cheer up your day? If so, you're in luck because Sue has graciously shared her pattern with the group and has given me permission to share it with everyone who reads this blog! Hooray for Sue!


Sue's butterfly (© Sue Taylor SmocknBird 2012)
Start with a magic circle or 5 ch joined into a circle
Round 1: 3ch 2dc, 2ch *3dc 2ch* 4x( – 5 3dc groups) 2ch turn work – do not join
Round 2: *3dc 2ch 3dc into 2ch space* 4 X 2ch and join with a slip stitch into top of treb le of previous round. Turn work
Round 3: Work *5 dc into 2ch space, 3ch make picot by sl st into first ch, 5 dc, sl st into space between 3dc groups of previous round* repeat 3X
Slip stitch down to the V. Tighten thread from magic circle but do not weave it – we are going to use it for one of the antennae. Using the working thread cut off about 12 “.
Pull through loop to fasten off.
Wrap thread around body of butterfly about 4 -5 X. Knot both threads together at the top and trim ends to desired length for antennae.
Your butterfly is complete!

I also have a pdf of the pattern that includes step by step photos but can't work out how to upload a pdf to my blog, so if you want a copy, leave me a comment with your email address and I'll send one off to you. Otherwise you'll have to wait till I make a couple of my own and take some pictures to post up!

Saturday, September 29, 2012

Cinnamon Swirl Sugar Cookies

Kids are weird. I know this isn't news to most parents but every now and again, something happens that will remind me how strange kids can be.


I recently decided to make some cinnamon swirl sugar cookies after seeing a picture of some in my Pinterest feed. L loves to help when I do any sort of baking, but cookies are his ABSOLUTE FAVOURITE since he has discovered the joys of unbaked cookie dough. (M is a pretty big fan too!)


I decided to use one of the recipes I already had for sugar cookies which have been a huge hit every time I've made them, instead of using a packet mix as specified in the original recipe. I rolled out the dough, added the cinnamon sugar, rolled it back up and stuck it in the fridge to firm up. L enjoyed licking the beaters and bowl. After the allocated firming time, I took the rolled dough logs out of the fridge and sliced them into 1.5cm slices. I decided I didn't want weird looking cookies so I sliced the ends off first to make the roll neater and L obligingly ate them.


Once the cookies were baked, I removed them and let them cool overnight then, the next morning, I made up the icing/glaze and drizzled it over the top of the cookies. Then the weird thing happened. L decided he didn't want any of the cookies. He kept this stance up for three days. THREE DAYS. NO COOKIES.


On the fourth day, I was sharing a cookie with M for afternoon tea and I asked L why he was so against these cookies. After all, they had all his favourite things. Sugar cookie. Cinnamon sugar. Icing sugar. (Notice the trend?) He said that he didn't think they looked very nice once I had glazed them. If I had left them unglazed, then he would've tried them. I pointed out the glaze was icing sugar and milk. So he relented and had a bite of the cookie that I was sharing with M. He then declared that he loved them. And proceeded to eat the rest of my cookie.

Perhaps I should have left him thinking they weren't very nice so I didn't have to share them.

Anyway, here is the recipe!

Cinnamon Swirl Sugar Cookies (Adapted from this recipe and this recipe)

Ingredients
cookie dough -
2 1/2 cups self raising flour
1 teaspoon cream of tartar
1/2 (slightly rounded – not quite ¾) teaspoon salt
250 gm unsalted butter (if you use salted butter, use only ¼ tsp. salt), softened
2 cups castor sugar
3/4 teaspoon good vanilla extract
3 egg yolks
extra flour for dusting workbench
cinnamon swirl -
1 tbsp. butter, melted
¼ cup castor sugar
1 tbsp. ground cinnamon
glaze -
¾ cup icing sugar
1 tbsp. milk

Directions

In a mixing bowl, cream the butter and sugar. Beat in the vanilla then, one by one, beat in the egg yolks.

Slowly stir in the flour. Mix well.

(If not using for cinnamon swirl cookies, form into 2.5cm balls and place balls about 5cm apart on a non-stick or baking paper lined cookie sheet. Bake for 10-12 minutes at 180C degrees or until the cookies start to brown around the edges. Let cool on cookie sheet for 2 minutes, then transfer to a cooling rack.)

On a floured surface, knead dough lightly, then divide dough into quarters. Roll each quarter out onto some baking paper to about 1/2 cm thickness.

Brush dough with melted butter. In a small bowl, mix together sugar and cinnamon. Sprinkle this mixture evenly over dough.

Using the baking paper, roll dough into a log, starting at the long side. (If the dough tears at all, do not worry. Just pinch it back together, it will still bake up nicely.)

Wrap log in plastic wrap and pop dough in the freezer for about 20-30 minutes (until firm – not hard)

Heat oven to 180C degrees. Cover your baking sheet with baking paper.
Take dough out of freezer and cut into 1.5cm slices. (If dough tears a little as you cut it just pinch it together with your fingers.)
Place slices about 5cm apart on cookie sheet.

Bake 10-12 minutes or until edges are lightly golden brown.

Cool for about 2 minutes, remove from cookie sheet to cooling rack. Cool completely.

In a small bowl, mix icing sugar and milk until smooth (adding a tad more milk if necessary).
Drizzle icing over cooled cookies (making sure you have aluminium foil or waxed paper underneath cooling racks to catch excess icing). Alternately, you can place the icing into a bag, snip the corner off and "pipe" the icing onto the cookies.

Thursday, September 27, 2012

Wine or Wool?

Being pregnant and then breast feeding has meant that I haven't had any wine for the last two years. How depressing. While I was looking at the wine collection this morning (which incidentally has still dwindled due to J's lack of abstinence in that department) I noticed that we had some cardboard 6 bottle carriers. Which gave me an idea. So 60 seconds later, with the help of a large knitting needle, I had this!


It holds six 100gm balls of yarn, is completely portable and best of all, was free with the purchase of 6 bottles of wine. You could add grommets or eyelets to make the holes snag free, or put the yarn in plastic bags if you're worried about the yarn snagging on the cardboard but for cheap acrylic, it works a treat just the way it is. And once I stop breast feeding, I can do 5 ball projects and have room for a roadie!

Sunday, September 16, 2012

Not Quite a Granny Sunhat pattern

I was asked by some of the lovely ladies from the Krista group if I could give them the pattern for the sunhats that I made recently. I've never written a pattern before so I'm expecting lots of mistakes. Feel free to let me know if something doesn't make sense, that way I can edit the pattern to make it clearer.

Those of you who have read my earlier posts will know that the sunhat came about quite by accident. I made a beanie for the daughter of a friend, but when I gave it to her and tried it on her daughter, I decided that it was a tad too short. Being the perfectionist that I am (or can be), I decided to take it home and add a couple of extra rows to it. Once I got home though, it occured to me that the weather was already starting to warm up, and it wouldn't be beanie weather for much longer, so rather than making the beanie longer, I decided to add a brim to it and make it into a sunhat. A bit of Googling and Pinteresting and I discovered that if you increase the number of stitches by 12 each round, you end up with a sunhat brim.

That being the case, you could adapt any beanie pattern you have to turn it into a sunhat. Just skip the last round or two of the beanie pattern so the hat section finishes at the top of the ears, then start your increases to make the brim. I chose to do one with a fairly open pattern to let lots of air through to keep the wearer cool. I've done a few of these using different size hooks to vary the size of the hat, you'll find the details of the approximate sizes in the pattern.

Some things you'll need to know for this pattern:
Magic circle aka adjustable ring. There are heaps of youtube movies about this, as well as tutorials with lots of pictures. You can try this tutorial from Crochet Spot but if it doesn't work for you, do a search on google or youtube if you're a visual learner.
Initial Treble without Starting Chain. Again, lots of youtube movies and tutorials around for these. I much prefer the look of these to doing chains at the beginning of a row/round - they get rid of that weird skinny stitch and hole you see in your work when you do a chain 3 at the beginning in place of a treble. Try this one from Crochet Spot but keep in mind they are AMERICAN so they refer to the stitch as a DOUBLE CROCHET, not a TREBLE.
Initial Half Treble Without Starting Chain. You guessed it! Where would we be without the internet? Try this one from Crochet Spot but keep in mind they are AMERICAN so they refer to the stitch as a HALF DOUBLE CROCHET, not a HALF TREBLE.

You'll notice that I turn my work after each round for the main part of the hat for this pattern. I mainly do this because I'm lazy and this way the next chain space after joining each round is right there next to the join (all the stitches are done in chain spaces for the hat body). No slip stitching to the next chain space for this girl!

Anyway, without any further ado, here is my "not quite a granny sunhat" pattern. Enjoy!


Pattern uses international terminology.

Materials:
approx 50gm 8 ply yarn of choice

yarn needle
* sizing will depend on tension - as a guide:
4.5mm hook for newborn size - 9 mths
5mm hook for 9mths - 2 years
5.5mm hook for 2-5 years
6mm hook for 5-10 years


Stitches and abbreviations used:
ch (chain)
htr (half treble)
ss (slip stitch)
tr (treble)

Start with a magic circle/adjustable ring or ch 4, join with ss in first stitch to form a ring.
Hat top -
Rnd 1: *tr into magic circle, ch1* 6 times. join with ss in to top of first tr. turn work.
Rnd 2: *3 tr in next ch 1 space, ch 1* 6 times. join with ss in to top of first tr. turn work.
Rnd 3: *(2 tr, ch 1, 2 tr, ch 1) into same ch 1 space* 6 times. join with ss in to top of first tr. turn work.
Rnd 4: *3 tr in next ch 1 space, ch 1* 12 times.  join with ss in to top of first tr. turn work.
Rnd 5: *(2 tr, ch 1, 2 tr, ch 1) into same ch 1 space* 12 times.  join with ss in to top of first tr. turn work.
Hat side -
Rnds 6 - 13: *2 tr into next ch 1 space, ch 1* 24 times.  join with ss in to top of first tr. turn work.
Hat brim -
Rnd 14: *2 htr in ch 1 space, htr in next two stitches, htr in next ch 1 space, htr in next two stitches* 12 times. join with ss to first htr. DO NOT TURN FOR REMAINDER OF HAT.
Rnd 15: *2 htr in same stitch, htr in next 6 stitches* 12 times. join with ss to first htr.
Rnd 16: *2 htr in same stitch, htr in next 7 stitches* 12 times. join with ss to first htr.
Rnd 17: *2 htr in same stitch, htr in next 8 stitches* 12 times. join with ss to first htr.
Rnd 18: *2 htr in same stitch, htr in next 9 stitches* 12 times. join with ss to first htr.
Rnd 19: *2 htr in same stitch, htr in next 10 stitches* 12 times. join with ss to first htr.
Rnd 20: *2 htr in same stitch, htr in next 11 stitches* 12 times. join with ss to first htr.
Rnd 21: *2 htr in same stitch, htr in next 12 stitches* 12 times. join with ss to first htr. 
Rnd 22: ss round. fasten off, weave in ends.

If you are a little on the lazy side like me and don't particularly like counting,  you could use 12 stitch markers when you are doing the brim. Place a marker in the first of each of the "2 htr in ch 1 space" stitches in round 14, and then increase when you get to the marker on each subsequent round. No more counting backwards when you've had to put your project down to tend to little people!

After round 6.
Starting round 15.
See all the stitch markers placed in round 14?
No need to count stitches from now on.
Finished!

Friday, September 14, 2012

The Krista Ladies

About six months ago, Spotlight started a "block a week" crochet project on their Facebook page. There were 25 blocks in all and once you finished all the blocks, you joined them together to make your "Krista" throw rug. Shortly after this started, the Krista Crochet Group was created on Facebook by a lovely lady called Eva, for people to chat about the project and give each other help and support.

I have to say that these ladies are awesome, and one of the nicest groups of ladies I've never actually met. They are incredibly supportive and a wealth of information and ideas when it comes to crochet. I suspect that I wouldn't have gotten as adventurous with my crochet as I have without the unwavering support of these ladies. I definitely wouldn't have spent as much money on yarn, hooks and books!

Even though the Krista project has finished, the group seems to still be going strong, although the main topic of discussion has moved from the block of the week to more general chit chat and discussions about other works in progress. The ladies have also been busy making blocks to be donated and joined together to create love and support blankets for cancer sufferers and stroke victims, to support an arts project (a giant QR code made of black and white crochet squares), to show support for one of the members in her efforts to give up smoking and are even crocheting pink bits to raise money and awareness for breast cancer.

I love the idea of making a square and donating it to be part of something bigger - it gives me the chance to try out a new pattern without being tied down to committing ridiculous amounts of time to make the completed throw rug myself. In the last month of so, I've been buying balls of yarn in lots of different colours so that when projects like this come along, I've already got something in my stash that I can use for it.

Being part of a group like this has been fantastic for me... none of my friends crochet so I don't get the opportunity to swap ideas and patterns and things with any of them (although I'm sure they are all incredibly pleased that I hook and can create lovely little things for them and their little girls :D). Being an online thing means that I can usually just pop on whenever I have some time to myself (not as often as I would like, but that's what you get when you have a 14 month old), and there is usually someone around that I can bounce ideas off or a new picture to inspire me to want to try something out.

I have to give a special mention to the other Kim in the group. Not only does she constantly inspire the group with her creations, but she seems to always be there to answer questions on how to do things and actually found the time to rewrite all the patterns for the Krista blocks into simple step by step instructions complete with pictures. I've told her that she should write a blog, her stuff is THAT good, but failing that, I'll see if I can get her permission to link to some of her files or show you some of the stuff she's made.